Villager Minecraft Jobs: An Essential Guide for Players
Welcome to the ultimate guide on Villager Minecraft Jobs! Whether you’re new to Minecraft or a seasoned veteran, understanding the intricacies of villager jobs is crucial for a thriving, well-balanced game world. Villagers play a vital role in your survival and growth, offering services like trading, crafting, and providing specialized goods. This guide is designed to provide you with all the information you need to make the most out of your villager system, starting from the basics and progressing to more advanced strategies.
Introduction to Villager Jobs
Villagers in Minecraft are more than just idle NPCs; they have distinct professions that can greatly enhance your gameplay experience. Each villager has a unique job site block associated with their profession, which can be found in villages or generated when you create a new village. These jobs range from Farmers to Clerics, each providing different trades and benefits.
Understanding Job Sites
To fully leverage villager jobs, it’s essential to understand job site blocks. Job site blocks are the hubs of each villager’s trade system, determining what services they can offer.
Types of Job Site Blocks
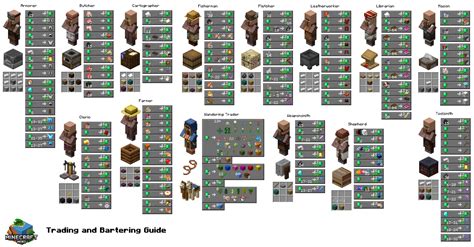
Here’s a list of various job site blocks available in Minecraft:
| Job Site Block | Profession |
|---|---|
| Lectern | Librarian |
| Crafter’s Stand | Fletcher |
| Grindstone | Armorer |
| Blast Furnace | Weaponsmith |
Placing Job Sites
Placing a job site block in a village or near an existing villager is the first step to assigning a job. Villagers will then automatically select a profession based on available job sites and their current needs.
Quick Reference
Quick Reference
- Immediate action item: Identify and gather all necessary job site blocks for the professions you need.
- Essential tip: Regularly visit your village to rebalance trades by swapping jobs and repairing villager equipment.
- Common mistake to avoid: Placing job site blocks in uninhabited areas as this can cause lag and potential loss of the block.
Detailed How-To Section: Establishing a Farming Village
Establishing a thriving farming village is essential for resource management and trade efficiency. Here’s a step-by-step guide to creating an ideal farming village:
- Survey Your Village: Start by examining the village you intend to develop. Look for available plots and any existing structures like homes and church buildings.
- Gather Farming Tools: Collect necessary farming tools, such as hoes, sickles, and water buckets, to maximize the productivity of your farmers.
- Set Up Job Site Block: Place a Lectern in an unoccupied area within the village. This will assign the Librarian/Farmer profession to any nearby villager.
- Resource Allocation: Ensure that each farmer has easy access to farmland, ideally close to the Lectern to maximize efficiency.
- Trade Optimization: Farmers offer valuable trades for crops, seeds, and compost. Regularly balance trades by interacting with the Lectern.
- Maintain Crop Rotation: Use crop rotation to maximize yield and prevent soil depletion, ensuring your village remains productive over time.
Detailed How-To Section: Creating a Trading Hub
Creating a trading hub is a critical aspect of enhancing your Minecraft economy and ensuring resource availability. Follow these steps to establish a robust trading hub:
- Select an Ideal Location: Choose a location for your trading hub that’s easily accessible but away from any potential dangers, like hostile mob spawn areas.
- Gather Necessary Blocks: Collect various job site blocks for different professions, including Lecterns for Librarians, Looms for Tailors, and Composters for Farmers.
- Place Job Site Blocks: Strategically place these blocks within the trading hub area to maximize the efficiency of villager assignments.
- Villager Safety: Protect your villagers by building a secure area around the trading hub with barriers and well-lit pathways.
- Regular Trades: Regularly visit the hub to trade with villagers, balancing trades to get the most valuable items and ensuring villagers remain happy and productive.
- Villager Happiness: Keep villager happiness in check by providing food, beds, and reducing stress with appropriate lighting and safe environments.
Practical FAQ
How do I prevent villager kidnappings?
Villagers can be kidnapped by Zombie Villagers or other hostile mobs. To prevent this, ensure that your village is well-protected. Build secure buildings with light levels below 7, preventing hostile mobs from spawning inside. Use doors to restrict access and maintain a safe distance from zombie villages to avoid accidental attacks.
What is the best way to keep villagers healthy?
Villagers need three essential items to stay healthy: a bed, food, and proper lighting. To keep them happy, provide a variety of foods in their inventories and ensure every villager has access to a bed. For lighting, keep light levels above 7 in all buildings to prevent mobs from spawning and causing distress to villagers.
Can you automate villager trades?
While there’s no official automatic trading system in Minecraft, you can set up semi-automated systems using redstone and dispensers. For instance, you can use dispensers with water buckets to transport items to and from villagers. However, fully automated trading systems are currently not feasible within Minecraft’s current mechanics.
By understanding the basics of villager jobs, setting up appropriate job sites, and keeping a well-balanced trade hub, you can significantly enhance your Minecraft experience. From establishing a productive farming village to creating a bustling trading hub, these guides offer practical, actionable advice to ensure your villagers contribute effectively to your game world. Enjoy the game and may your village thrive!