Welcome to your comprehensive guide on Minecraft village seeds! Whether you’re new to the game or a veteran looking to refine your village exploration skills, this guide will walk you through the essentials. The key to enjoying Minecraft is discovering the vast world it offers, especially its unique villages. This guide will help you find and utilize village seeds, ensuring you make the most out of your adventures in Minecraft.
Understanding Minecraft Village Seeds
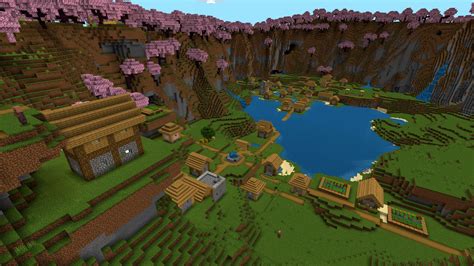
A village seed in Minecraft is a specific world seed that generates a village at a unique location. These seeds often include distinctive features like architecture, unique layouts, and special structures. Exploring these villages not only provides a new perspective on gameplay but also offers valuable resources, unique buildings, and even secret locations.
Why Use Village Seeds?
Village seeds are a fantastic way to kickstart your Minecraft journey with intriguing places to explore. Villages offer resources like wood, stone, and food, which are essential for early-game survival and base building. They also serve as hubs for various trades and interactions, providing an economic aspect to your gameplay. Plus, villages often have hidden secrets and unique architectural designs that make exploration an exciting endeavor.
Problem-Solution Opening
One of the biggest challenges players face is finding villages that suit their exploration needs. Some struggle with locating villages that offer new and exciting experiences. This guide will help address these issues head-on, offering actionable advice and real-world examples to ensure you discover and utilize the best village seeds efficiently. We’ll break down the steps to finding, exploring, and making the most out of these unique locations in Minecraft.
Quick Reference
- Immediate action item: Choose a village seed that fits your exploration style.
- Essential tip: Use Minecraft seed finders to locate the best village seeds.
- Common mistake to avoid: Failing to check village locations for hidden features.
Step-by-Step Guide to Finding Village Seeds
To find village seeds, you need to follow a series of structured steps:
Step 1: Choose Your Village Seed Type
Minecraft offers various types of village seeds, each with unique features:
- Desert Villages: Found in desert biomes and offer unique architecture.
- Taiga Villages: Found in taiga biomes, these villages are typically surrounded by trees.
- Plains Villages: Located in plains biomes, these villages are characterized by open land.
Step 2: Use Village Seed Finders
Several online tools and resources can help you find and explore village seeds:
- Minecraft Maps – Offers a collection of world seeds with village locations.
- MCSeeds – Allows you to search for specific village seeds and view them on a map.
Step 3: Generating Your World
Once you’ve selected a village seed, you’ll need to generate a new world with that seed:
- Open Minecraft and navigate to the main menu.
- Select “Singleplayer” and then “Create New World.”
- Scroll down to “More World Options.”
- Enter your chosen village seed in the “Seed for the World Generator” field.
- Ensure other settings are adjusted to your liking and click “Create New World.”
Step 4: Locate the Village
After your world has loaded, it’s time to locate the village:
- Start by looking at the spawn point on the map.
- Villages are often located within a few screen lengths from the spawn point, but it’s best to explore the area until you find it.
- Use the “F3” debug screen (only available in PC versions) to get coordinates and navigate easily.
Step 5: Exploring the Village
Once you’ve found the village, it’s time to explore:
- Gather Resources: Villages provide an abundance of useful items like wood, stone, and food.
- Trade with Villagers: Engage with villagers to trade resources and acquire items you need.
- Discover Hidden Features: Some villages have unique secrets, like secret rooms or unique builds.
Advanced Village Seed Techniques
Once you’ve mastered the basics, you can delve into more advanced techniques to get the most out of village seeds:
Technique 1: Multi-Village Exploration
In the same world, you can find multiple villages:
- Use the seed finder to identify additional villages in the vicinity.
- Generate a world and explore the nearby locations to find multiple villages.
- Collect resources from each village and trade with different villagers to diversify your inventory.
Technique 2: Village Upgrading
Villages can be upgraded into beacons, providing powerful benefits:
- Build a Beacon: Craft a beacon using a nether star and a lightning rod. Place it in a village to turn it into a beacon structure.
- Unlock Abilities: Different upgrades offer various effects like Haste, Regeneration, or Strength, depending on the village’s tower position.
Technique 3: Villager Management
Properly managing villagers can make your village a thriving hub:
- Build houses for villagers to keep them safe and prevent zombie attacks.
- Use curing rituals to turn zombie villagers back into valuable trades.
- Use emeralds and specific resources to trade and promote villager professions.
Practical FAQ
How do I find hidden features in villages?
Hidden features in villages can often be found by thoroughly exploring the surrounding areas. Pay attention to any unusual architecture or structures that stand out. Some villages may have secret rooms accessed through hidden doors, while others could include hidden storage or extra resources in less obvious places. Always look for small details, as village seeds often include unique features that can’t be immediately seen.
What’s the best way to trade with villagers?
Trading with villagers effectively requires understanding their professions and what they need in return. Here’s a step-by-step guide:
- Identify the villager’s profession using their clothes or tool set.
- Approach the villager and open their trade interface.
- Offer them items they require to complete trades. For example, farmers typically trade with crops, and weaponsmiths need iron items.
- Once a trade is completed, you can use the emeralds or the trade items to acquire other valuable resources.
- Continue trading to unlock more advanced trades or professions if the villager reaches a higher level.
Can I move villagers from one village to another?
Unfortunately, villagers cannot be directly moved from one village to another. However, you can build additional houses in your village and attract new villagers by removing old ones. To do this:
- Build a new house or structure that resembles a villager home.
- Leave the old villager house to attract wandering villagers. These will eventually move into the new house, and you can move the old villagers out of the village.
- Keep building new houses to continuously attract more villagers,