Unlock Your Creativity with Minecraft Banner Designs
Are you ready to elevate your Minecraft world by adding visually stunning banners? Whether you’re looking to showcase your personality, adorn your base, or celebrate in-game achievements, custom banner designs offer an exciting way to express yourself in Minecraft. This guide will walk you through everything you need to create incredible banner designs, addressing your needs and pain points with clear, practical, and actionable advice. Let’s dive in and transform your game!
From the simplest pattern to the most complex mosaic, each banner tells a story. But where do you start? What tools and patterns should you use? How do you avoid common mistakes? Don't worry; this guide will provide all the tips, tricks, and tools you need to master Minecraft banner design.
Quick Reference
Quick Reference
- Immediate action item: Start with simple shapes and patterns. Use the in-game loom to mix and match colors and patterns.
- Essential tip: Utilize the color palette tool to experiment with color combinations. This tool can help you plan your banner’s design before actual creation.
- Common mistake to avoid: Confusing colors due to the colorblind mode. Always double-check your design in colorblind mode to ensure visibility.
Step-by-Step Guide to Designing Your First Banner
Creating your first banner in Minecraft is an exciting step toward customizing your world. Follow these detailed steps to design a banner that’s both functional and visually appealing:
Step 1: Gather Your Materials
To design and create a banner, you’ll need the following items:
- One dye (any color you want)
- One stick (use an empty loom without patterns)
- One banner base (crafted from a loom)
Head to your crafting table, place a dye and a stick together, then add a loom to complete your banner base. Now, you’re ready to start designing!
Step 2: Use the Loom
The loom is the tool you’ll use to add patterns to your banner. Here’s how to use it:
- Place your banner base in the loom’s first slot.
- In the second slot, place your chosen dye color.
- Select the pattern of your choice from the pattern list in the loom.
- Click “Craft” to create your patterned banner.
Step 3: Create Complex Patterns
To create intricate designs, you need to be a bit more methodical:
- Create your base banner with the loom, selecting a simple pattern as your foundation.
- Switch to the crafting table and open your inventory. Craft the pattern you want to add using two dyed cloths and one stick.
- Use the loom again, place the base banner in the first slot, then the pattern you crafted in the second slot, and click “Craft” to combine them.
Step 4: Personalize with Symbols
Adding symbols to your banner can make it unique and personal. Here’s how to do it:
- Obtain a symbol pattern by combining symbols in the crafting table. You’ll need two symbols and a stick.
- Use the loom to place the base banner in the first slot and the symbol pattern in the second slot.
- Click “Craft” to create your personalized banner.
Detailed How-to: Designing a Banner with a Mosaic Pattern
Mosaic patterns can look impressive and can represent complex designs. Here’s a detailed guide to creating a mosaic:
Mosaic patterns involve breaking down an image into smaller pieces, known as “tiles,” and then combining these tiles on a banner to recreate the image.
Step 1: Plan Your Design
Before diving into the game, take time to sketch out what you want your mosaic to look like. Use a piece of paper or a digital tool to create a grid that matches the dimensions of your banner. Each square in your grid represents a tile on your banner.
Step 2: Prepare Your Tiles
Break your design into tiles by coloring each piece in your sketch a different color:
- Create each tile by placing a base banner in the loom and adding a color for each tile.
- Use simple patterns to start, then combine them into more complex designs.
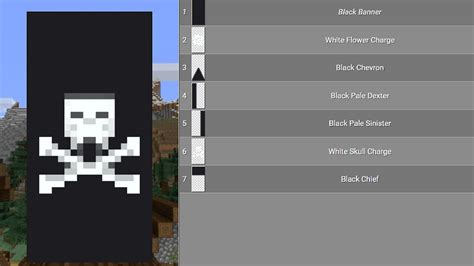
Step 3: Combine the Tiles
Now, it’s time to put it all together:
- Start with a blank banner base. Use a plain color or simple pattern as your starting point.
- Open the loom and place your first tile pattern in the second slot. Match the color and pattern precisely.
- Continue adding tiles one by one, placing each new pattern in the loom’s second slot.
- Click “Craft” each time you add a new tile to update your design.
By the end of this process, you should have a fully customized banner representing your design.
Practical FAQ
I can’t see my pattern well, what should I do?
When designing intricate patterns, it’s crucial to check how they appear in colorblind mode. Unfortunately, Minecraft does not have a built-in colorblind mode, but you can use external tools to simulate it. There are many online colorblind simulators available where you can input your colors and see how they appear to those with different types of color vision.
How do I get specific patterns?
Minecraft has a vast array of patterns you can use to design your banners. To find the pattern you want:
- Open your inventory.
- Navigate to the crafting table.
- Click on the “Crafting” option and scroll through the patterns section to find what you need.
- Some patterns are rare, so explore different combinations to find unique designs.
Can I recycle my old banners?
Yes, you can recycle old banners to recover dyes. To do this, open the loom and place your old banner in one slot and an empty loom in the other slot. This will break down your banner, and you’ll get back the original dye used.
Conclusion
Banner designs in Minecraft are a fantastic way to personalize your gaming experience and add decorative elements to your base or inventory. With this guide, you’ve now learned how to create basic banners, use the loom effectively, design complex mosaics, and troubleshoot common problems. Now it’s time to unleash your creativity and make your Minecraft world even more vibrant and unique.
Remember, practice makes perfect, so don’t hesitate to experiment with different patterns and colors. The more you play, the more inspired you’ll become to design intricate and beautiful banners. Happy crafting!