Are you ready to dive into the world of macOS names? Whether you're curious about the historical significance of these names, or you’re looking for a fresh and modern Mac with the latest features, this guide has you covered. From beginner to advanced users, we’ll walk you through everything you need to know about macOS names and provide actionable advice to help you make the most of your Apple experience.
We’ll start by addressing some common pain points users face when navigating through the multitude of macOS names. From confusing releases to understanding the implications of each name, we aim to demystify the entire process, helping you feel confident and informed as you explore the vast array of Apple’s operating systems.
Quick Reference
Quick Reference
- Immediate action item with clear benefit: Update your macOS regularly to access the latest security features and performance improvements.
- Essential tip with step-by-step guidance: To check your macOS version, click on the Apple logo > About This Mac.
- Common mistake to avoid with solution: Don’t ignore beta versions for regular use; they are not stable and meant for testing and feedback.
Understanding macOS Versions
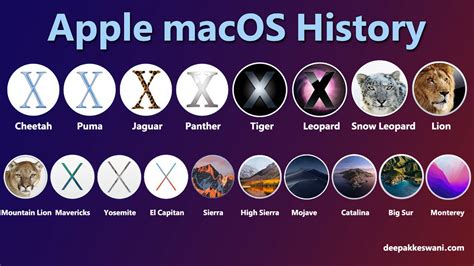
Navigating the different macOS versions can seem daunting. The operating system is named after prominent natural phenomena such as animals, plants, and geographical locations, following a specific chronological order. Understanding this system will help you quickly identify which version you’re running and what advancements it brings.
Here’s a breakdown of the major macOS releases:
| Release Year | Version Name | Key Features |
|---|---|---|
| 2019 | MacOS Catalina | New privacy controls, upgraded apps, and support for signing in with an Apple ID. |
| 2020 | MacOS Big Sur | Redesigned interface, support for M1 chip, updated apps with dark mode. |
| 2021 | MacOS Monterey | Universal clipboard, FaceTime support, enhanced Focus feature. |
| 2022 | MacOS Ventura | Enhanced privacy features, stage manager, updated widgets. |
If you’re a long-time macOS user, it’s critical to stay updated. Each new version brings significant improvements and security patches. To understand your macOS version, simply click on the Apple logo > About This Mac.
How to Upgrade to the Latest macOS Version
Upgrading to the latest macOS version can breathe new life into your aging Mac and introduce you to cutting-edge features. Here’s a step-by-step guide to make the upgrade process as seamless as possible.
Step-by-Step Guide
- Check System Compatibility: Before initiating the upgrade, check if your Mac is compatible with the latest macOS. Apple usually lists this information on their official website.
- Backup Your Data: Always create a backup of your important data before starting an upgrade. You can use Time Machine or any other preferred backup method.
- Download the Update: Go to the Apple menu > System Settings > Software Update. Click on “Download and Install” to get the latest macOS version.
- Prepare for Installation: Close all running applications and ensure your Mac is connected to a power source. An upgrade process can take a few hours, so plan accordingly.
- Installation Process: Once the download is complete, follow the on-screen instructions. The installer will prompt you to confirm your decision to upgrade. Select your startup disk and begin the installation.
- Post-Installation: After installation, your Mac will restart. Allow some time for it to boot up with the new operating system. Check the settings and update any applications.
Best Practices
- Regularly check for updates to ensure your macOS is always up-to-date.
- Review the release notes of each update to understand new features and improvements.
- Participate in beta programs if you’re eager to try new features early.
Common Mistakes to Avoid
- Don’t skip the backup step, as it’s essential to prevent data loss during the upgrade.
- Avoid using your Mac for other intensive tasks during the installation process, as it may cause interruptions.
- Don’t rush through the installation; follow the prompts carefully for a smooth upgrade.
Practical FAQ
Why should I upgrade to the latest macOS version?
Upgrading to the latest macOS version is crucial for several reasons. Firstly, it provides essential security updates that protect your Mac from the latest threats. Secondly, new versions often come with significant performance improvements and new features that enhance your overall user experience. Lastly, to ensure compatibility with the latest software and hardware, upgrading is necessary.
What should I do if my Mac is not compatible with the latest macOS?
If your Mac is not compatible with the latest macOS, don’t worry. Apple often provides multiple options for different hardware. You can check the official Apple website for a list of supported devices. In some cases, you might be able to upgrade to a previous version of macOS. If your Mac is particularly old, consider using the version of macOS that it originally came with, which may have received more extended support.
How do I revert to an older macOS version?
Reverting to an older version of macOS is possible but should be done carefully. Ensure you have a full backup of your data before starting the process. You can use Time Machine or another backup method. Once prepared, you can download the older macOS version from the Apple website and follow the installation instructions. Make sure you understand the implications, as reverting can sometimes cause issues with existing software and settings.
By now, you should have a comprehensive understanding of macOS versions, upgrade processes, and how to keep your system running smoothly. Staying informed and up-to-date will not only enhance your user experience but also maximize the performance and security of your Mac.
For more advanced users looking to delve deeper, consider exploring system optimization tips, troubleshooting common issues, and customizing your macOS to fit your workflow perfectly. With the knowledge and practical advice provided here, you’re well on your way to mastering macOS.