Are you looking to create captivating and functional lighting setups in Minecraft to enhance your gameplay experience? Whether you're designing a grand castle, a spooky dungeon, or a serene garden, the right lighting can transform your world. This comprehensive guide will provide you with everything you need to master Minecraft lighting sources, ensuring your builds are both aesthetically pleasing and functional. From understanding the basics to executing advanced setups, we've got you covered.
Problem-Solution Opening
Minecraft is a game where creativity knows no bounds. Yet, even the most imaginative players often find themselves struggling with lighting. Poorly lit areas can ruin the mood of your creations, making it hard to find hidden traps or navigate through complex structures. Furthermore, understanding which lighting sources are most efficient or decorative can be daunting, especially with so many options available. This guide aims to solve these problems by offering step-by-step guidance, real-world examples, and actionable advice to help you create stunning, well-lit builds in Minecraft. Let’s dive into the world of Minecraft lighting and see how to make your creations shine!
Quick Reference
Quick Reference
- Immediate action item: Replace torches with glowstone or sea lanterns for more efficient, brighter lighting.
- Essential tip: Use a combination of lighting sources like redstone lamps, soul sand lamps, and lanterns for variety and to reduce lag.
- Common mistake to avoid: Overloading your build with too many light sources can cause lag; spread them out evenly.
Choosing the Right Lighting Sources
Selecting the right lighting sources is crucial for achieving the desired atmosphere in your Minecraft build. Here’s a detailed look at some of the most popular and effective lighting options available in the game:
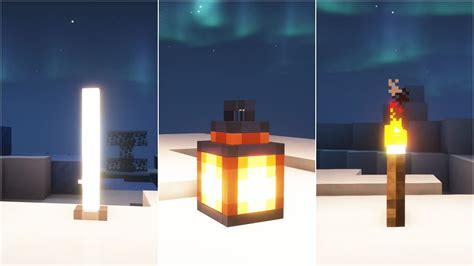
Torches
Torches are perhaps the most common lighting source in Minecraft, providing a straightforward way to light up areas. They are easily crafted using a stick and a flint. Although functional, torches do have some drawbacks. Their relatively dim light and occasional despawning can be a nuisance. It’s essential to place them frequently and ensure they’re visible.
Glowstone
Glowstone offers a more vibrant and bright alternative to torches. This block can float in mid-air and provides powerful lighting, making it ideal for creating dramatic, illuminated areas. To get glowstone, mine it from deep underground caves or obtain it as loot from fortress chests.
Sea Lanterns
Sea Lanterns are unique to the Underwater Adventure Update and offer a soft, underwater glow. These lanterns don’t require a solid block to be placed on, and they provide a nice visual effect when lit underwater. Perfect for underwater bases and aquatic structures, sea lanterns provide continuous light that won’t fade over time.
Redstone Lamps
Redstone Lamps utilize redstone power to provide light. When a redstone wire is placed adjacent to the lamp, it turns on, emitting a bright light. These lamps are great for decorative purposes and can be used to light up complex builds without taking up valuable space.
Soul Sand Lamps
Soul Sand Lamps are a recent addition and provide a subtle, bioluminescent glow. They are great for creating a mystical, enchanting atmosphere in your builds. To craft one, you need soul sand and a torch. These lamps are useful for night-time decorations in Nether or soul sand valley builds.
Lanterns
Lanterns are versatile lighting sources that can be hung from ceilings or walls using a cobweb. These provide a steady light, similar to torches, but they offer a more decorative appearance and don’t despawn. Crafting a lantern requires a feather and a torch, which can be hung from cobwebs.
Detailed How-To: Setting Up Efficient Lighting
Creating efficient lighting in Minecraft involves balancing aesthetic appeal with functionality. Here’s how to set up lighting that’s both efficient and effective:
Step-by-Step Guide to Efficient Lighting
1. Assessment: Start by assessing the areas that require lighting. Identify dark corners, complex structures, and hidden passages that need illumination.
2. Plan: Decide on the type of lighting source you want to use based on the aesthetic and functional needs of the area. Consider using a mix of glowstone, sea lanterns, redstone lamps, and lanterns to create variety and reduce lag.
3. Placement: Begin placing your chosen lighting sources. For ceilings and walls, use lanterns and redstone lamps. For floor areas, place glowstone and soul sand lamps. Ensure the lighting is evenly distributed to avoid dark spots.
4. Testing: After placing the initial lighting, test the visibility and light levels in different areas of your build. Adjust the placement and type of lighting as needed to ensure adequate illumination.
5. Optimization: To optimize performance and reduce lag, avoid overcrowding your builds with too many light sources. Spread them out evenly and use non-solid light sources like sea lanterns where applicable.
Example Project: Illuminating a Grand Castle
Let’s apply these steps to a grand castle project:
- Assessment: The castle has several large chambers, corridors, and hidden passageways that need lighting.
- Plan: Use glowstone for the main halls and soul sand lamps for enchanted, mystical areas. Redstone lamps will be placed in intricate structures and corridors.
- Placement: Begin with placing glowstone blocks on the floors and ceilings of the main halls. Use soul sand lamps in areas leading to enchanted dungeons. Hang redstone lamps from the ceilings in the corridors and intricate structures.
- Testing: Walk through the castle to ensure all areas are well lit. Adjust the placement if any dark spots remain.
- Optimization: Avoid clustering lighting sources. Spread out the glowstone and soul sand lamps to cover large areas without causing lag.
Detailed How-To: Advanced Lighting Techniques
Once you’re comfortable with basic lighting setups, it’s time to explore advanced techniques to elevate your Minecraft builds:
Step-by-Step Guide to Advanced Lighting
1. Layered Lighting: Use different lighting layers to add depth and dimension to your builds. Combine wall-mounted redstone lamps with floor-based glowstone for a multi-layered effect.
2. Dynamic Lighting: Integrate redstone circuits to create dynamic lighting effects. Use redstone lamps to change lighting based on game mechanics, such as switching on lights when a player activates a lever.
3. Special Effects: Use sea lanterns for underwater areas and lanterns on cobwebs for eerie, floating light effects. Create glowing pathways using glowstone blocks placed at ground level.
4. Aesthetic Coordination: Match the lighting style to the theme of your build. For medieval castles, use warm, earthy tones from torches and redstone lamps. For futuristic builds, opt for cooler, bright light from sea lanterns and glowstone.
Example Project: Creating a Dynamic, Themed Castle
Let’s design a dynamic, themed castle with various lighting effects:
- Layered Lighting: Use glowstone blocks on the floors of the main halls and redstone lamps on the ceilings for a layered effect.
- Dynamic Lighting: Install redstone circuits that activate lights in the dungeons when players trigger a switch.
- Special Effects: Place sea lanterns in underwater corridors and hang lanterns on cobwebs in eerie, hidden areas.
- Aesthetic Coordination: For a medieval theme, use warm, earthy tones. For a futuristic theme, use bright, cool lights.
Practical FAQ
Common user question about practical application
How do I prevent lag when using multiple lighting sources?