Understanding why you might want to uninstall Valorant is essential before diving into the steps. Whether you’re experiencing performance issues, space constraints, or simply no longer wish to play the game, it’s important to handle the uninstallation process correctly to ensure a smooth experience. This guide will walk you through every step to successfully uninstall Valorant, while providing tips, best practices, and common pitfalls to avoid.
Why Uninstall Valorant?
Uninstalling Valorant could be for various reasons, such as:
- Resolving performance issues or system slowdowns.
- Freeing up storage space on your device.
- Deciding you no longer want to play the game.
- Switching to other games or interests.
Despite its benefits, uninstalling a game can sometimes be complicated, especially if you’re not familiar with the process. This guide aims to simplify that for you.
Quick Reference
Quick Reference
- Immediate action item: Close any running Valorant instances before starting the uninstallation process.
- Essential tip: Back up any important files or data from Valorant before uninstalling, if necessary.
- Common mistake to avoid: Forgetting to check if there are leftover files or configurations post-uninstallation.
Step-by-Step Guide to Uninstall Valorant
Follow these steps carefully to ensure a successful uninstallation:
Step 1: Close Valorant and Related Processes
Before you start uninstalling Valorant, make sure to close the game completely:
- Exit Valorant through the main menu by selecting “Logout” and then “Exit Game.”
- Ensure no Valorant-related processes are running in the background. Open the Task Manager (Ctrl + Shift + Esc), look for “valorant” or “Vanguard” processes, and end them.
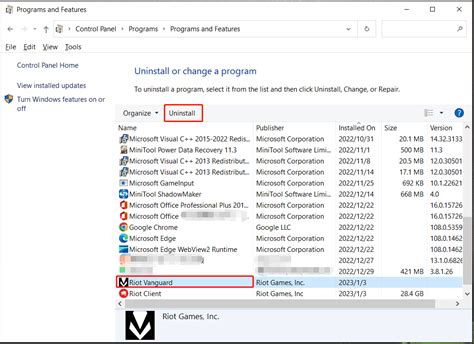
Step 2: Uninstall Valorant from Your PC
This is the primary step in removing Valorant:
- Go to the Control Panel on your Windows PC.
- Select “Programs” > “Programs and Features.”
- Find “Riot Vanguard” and “Valorant” in the list of installed programs.
- Right-click on both and select “Uninstall.” Follow the on-screen prompts to complete the uninstallation process.
Step 3: Remove Leftover Files
Even after uninstalling Valorant, some files and configurations may remain:
- Open File Explorer.
- Navigate to the following directories and delete any remaining Valorant or Vanguard files:
- “C:\Riot Games”
- “C:\Users[YourUsername]\AppData\Local\Riot Games”
- “C:\ProgramData\Riot Games”
- Empty your Recycle Bin to ensure these files are completely removed.
Step 4: Delete User Data
To ensure no traces of your game data remain, delete the following files:
- Open File Explorer.
- Navigate to:
- “C:\Users[YourUsername]\AppData\Roaming\Riot Games\VGUInstall\”
- Delete the “VGUInstall” folder.
- Check for any other related directories in “AppData\Roaming” and delete if they exist.
Step 5: Remove Vanguard (Security Software)
Vanguard is a security program used by Valorant. To fully remove it:
- Open Command Prompt as an administrator (right-click the Start button > “Command Prompt (Admin)”).
- Type the following command and press Enter:
- “sc query vanguard”
- Note the Service Name (it might be “vanguard”).
- To stop the service, type:
- “sc stop [ServiceName]”
- To delete the service, type:
- “sc delete [ServiceName]”
Step 6: Reboot Your System
After completing all the steps, reboot your computer to ensure all changes take effect and to clear any lingering temporary files.
Practical FAQ
What if I encounter issues during uninstallation?
If you face issues like unable to uninstall or errors during the process, try these steps:
- Ensure no Valorant or Vanguard processes are running (refer to Step 1).
- Use the “Programs and Features” tool to uninstall, as this provides more control.
- If problems persist, consider using a third-party uninstaller like Revo Uninstaller for more thorough removal.
- For Vanguard specifically, use the commands mentioned in Step 5 for a deeper removal.
Should you encounter errors, restart your computer and attempt the uninstallation again.
Will uninstalling Valorant remove my saved settings?
Yes, uninstalling Valorant typically removes all game settings and configurations. To preserve any settings or progress, make sure to back up critical data before uninstalling. This might include:
- Profile settings
- Game configurations (such as key binds)
- Any in-game progress saved locally
While these files should be removed with the uninstallation, backing up can offer peace of mind if you might reinstall in the future.
How can I ensure that no Valorant or Vanguard files are left behind?
To ensure a clean removal:
- Use File Explorer to manually check and delete directories as mentioned in Steps 3 and 4.
- Use third-party software like CCleaner to thoroughly clean up any residual registry entries or leftover files.
- After removing all files, reboot your computer to finalize the cleanup process.
Following these steps ensures that Valorant and Vanguard are completely uninstalled, and no remnants are left on your system.
Can I reinstall Valorant after uninstalling it?
Yes, you can reinstall Valorant at any time. To reinstall:
- Visit the official Valorant website and download the installer.
- Run the installer and follow the on-screen prompts to install Valorant.
- Upon installation, you might need to reinstall Vanguard if required by the new installation process.
If you had any issues or settings previously, you’ll need to reconfigure them from scratch after reinstallation.
By following this comprehensive guide, you’ll be able to uninstall Valorant efficiently, ensuring no leftover files interfere with your system. Whether it’s due to performance issues, storage space, or simply no longer wanting to play, this process will help you get back to a clutter-free gaming environment.