Welcome to our comprehensive guide on how to make powered rails for your Minecraft setup! Whether you’re looking to transport items quickly across long distances or simply want to streamline your gameplay, powered rails can be a game-changer. This guide will take you through everything you need to know, from understanding the basics to implementing practical solutions for optimizing your setup.
Why Powered Rails Are Essential
Powered rails in Minecraft can significantly enhance your efficiency by automating item transport. This guide addresses common user needs, ensuring that you can easily integrate powered rails into your base without overwhelming technical jargon. From players who are new to Minecraft mechanics to seasoned veterans looking to refine their setups, this guide is tailored to meet a wide range of expertise levels.
Quick Reference
Quick Reference
- Immediate action item: Ensure you have at least one Redstone dust, one Powered Rail, and one regular Iron Rail.
- Essential tip: To install a powered rail, place an Iron Rail and then right-click with a Redstone block to turn it into a Powered Rail.
- Common mistake to avoid: Misaligning the Redstone source can prevent your powered rails from functioning correctly.
Step-by-Step Guide to Crafting Powered Rails
Let’s get started with the basics of creating and placing powered rails in Minecraft. We’ll walk you through every step, ensuring that even those new to the game can follow along without any trouble.
Gathering Materials
Before you begin, gather the required materials. Here’s a list to get you started:
- Iron Ingots: 4 (to craft an Iron Rail)
- Redstone Block: 1 (to convert an Iron Rail into a Powered Rail)
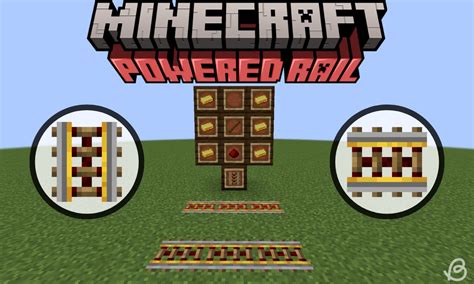
Crafting an Iron Rail
First, head over to your crafting table. You’ll need to craft an Iron Rail. Open the crafting table and place the four Iron Ingots in a 2x2 square. This will yield one Iron Rail.
Converting Iron Rail to Powered Rail
With your Iron Rail in hand, head back to the crafting table. Open it and place the Iron Rail in one of the slots. Then, place the Redstone Block in the slot directly to the right of the Iron Rail. This will result in one Powered Rail in the output box.
Placing Powered Rails
Now that you have your Powered Rails, it’s time to place them in your world. Follow these steps:
- Select your Iron Rail and place it on the ground where you want your powered rail to be.
- Equip the Powered Rail in your hand and right-click on the Iron Rail to convert it into a Powered Rail.
Detailed How-To: Optimizing Your Powered Rails Setup
For those who want to delve deeper into optimizing their powered rails setup, this section will cover advanced techniques and configurations. Let’s break down the best practices for a flawless experience.
Understanding Rail Placement
Placing powered rails correctly is essential for efficiency. Ensure that the Redstone block is always placed on the side of the Iron Rail that faces the direction you want the minecart to move.
Using Minecarts on Powered Rails
To utilize powered rails, you’ll need minecarts. Here’s how to do it:
- Right-click the Powered Rail to place a minecart on it. This can be any type of minecart, such as a Chest, Hopper, or regular minecart.
- Once the minecart is on the powered rail, it will start moving in the direction dictated by the Redstone block placement.
Managing Multiple Tracks
If you’re managing a complex setup with multiple powered rails, organization is key. Here are some tips:
- Utilize intersections and crossings to route minecarts efficiently.
- Use signs, item frames, or banners to label different rail lines.
Troubleshooting Common Issues
Sometimes things don’t go as planned. Here are common issues and their solutions:
- Minecart not moving: Check the Redstone block alignment and ensure there are no obstructions.
- Rails getting stuck: Make sure there are no gaps in the rail system which can cause the minecart to stop.
Practical FAQ
Can powered rails work on any type of surface?
Powered rails must be placed on solid blocks. Water, lava, and other non-solid surfaces will not support them.
How do I create a looped powered rail system?
Creating a loop involves placing minecart stops or minecart with hoppers to safely break the loop without causing a crash. You’ll need to manually remove the minecart at the end of the loop before placing it back on the rails.
Is there a way to power multiple powered rails from one Redstone block?
Yes, you can power multiple powered rails by connecting all Redstone blocks to a single Redstone wire. Ensure that each powered rail has its own Iron Rail underneath and they are all connected to the same Redstone source.
This detailed guide should help you master the art of making and optimizing powered rails in Minecraft. By following these practical steps, tips, and solutions, you’ll be well on your way to creating an efficient and well-organized transport system. Happy building!