Welcome to the Ultimate Guide on Making a Powered Rail in Minecraft
As you delve into Minecraft's complex world of possibilities, one of the most exciting and practical inventions is the Powered Rail. These rails can significantly streamline your journey across expansive maps, making transportation both efficient and strategic. Whether you're racing against time to complete quests or just traversing the land with a heavy load, this guide will walk you through every step to create and optimize your own Powered Rails. Let's address the needs of users who crave efficiency, innovation, and a seamless Minecraft experience.
Powered Rails are a game-changer in Minecraft. They allow mobs or players to move faster than regular rails and can be especially useful for those long distance treks or intricate redstone contraptions. However, setting these up can sometimes be a bit tricky. This guide will provide you with the actionable steps, practical examples, and expert tips to master the art of building and utilizing Powered Rails.
Quick Reference
Quick Reference
- Immediate action item with clear benefit: Place a gold block next to your regular rail to create a powered rail. This instantly accelerates the movement of entities on the rail.
- Essential tip with step-by-step guidance: To avoid damaging items while moving quickly, always ensure your rail is part of a loop and use observers and dispensers to control the speed.
- Common mistake to avoid with solution: Misplacing the gold block next to the rail can result in a regular rail. Always check the orientation of the gold block and place it directly adjacent to the rail block.
Step-by-Step Guide to Creating a Powered Rail
Creating a powered rail in Minecraft can be broken down into several simple steps. Here’s how you can do it:
Step 1: Gather Your Materials
To create a powered rail, you need two key items: a regular rail and a gold block. Here’s a quick checklist:
- 1 Regular Rail
- 1 Gold Block
Step 2: Positioning the Rails
Find a spot where you need the powered rail and place your regular rail down. You can do this by right-clicking with the rail in your hand. The rail will be placed on the ground as a straight track.
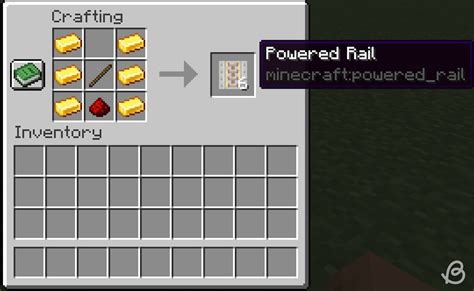
Step 3: Placing the Gold Block
Next, you need to place the gold block adjacent to the rail. This needs to be directly next to the rail in any of the cardinal directions (up, down, left, right). Place the gold block so that its face is touching the rail block. This will convert the regular rail into a powered rail.
Step 4: Testing Your Powered Rail
To test if your rail is functioning as a powered rail, place a minecart on it (or have a friendly mob stand on it). When you activate the rail using a redstone torch, lever, button, or pressure plate, the minecart or mob should move faster than on a normal rail.
Detailed How-To Sections
Enhancing Efficiency: Loops and Redstone Integration
To fully leverage the power of your powered rails, it’s crucial to understand how to integrate them into loops and use redstone to control their operation.
Here’s a more advanced method to ensure your powered rail functions efficiently without damaging items:
Creating a Looped Powered Rail
Using loops, you can create a continuously powered rail segment that moves entities in a circular motion. Here’s how to set it up:
- Place a regular rail on the ground in a loop.
- Attach a gold block adjacent to one section of the rail.
- Ensure that the loop is completed by placing another powered rail segment in the opposite direction to connect back to the starting point.
- Use redstone to control which section is powered at any given time.
Step-by-Step Loop Creation
- Design the Loop: Plan a circular track. This ensures that items or mobs don’t get stuck in a single section of the rail.
- Power Sections: Place your powered rails strategically to cover the entire loop. Ensure each segment is correctly oriented with the gold block touching the rail.
- Redstone Control: Add redstone torches, levers, or buttons along the rail to control which section is active. This will prevent overloading and allow for directional control.
- Test the System: Place a minecart in the loop and activate the redstone to ensure everything moves as expected. Adjust the redstone control as necessary.
Practical FAQ
What happens if I place the gold block incorrectly?
If the gold block is not correctly placed next to the rail (so that it directly touches it), the rail will not be powered. Instead, it will function as a regular rail. To fix this, simply remove the gold block and place it correctly.
Can powered rails work with all items?
Powered rails work with most items that typically use regular rails, including minecarts, mobs, and even some types of containers like chests. However, items that don’t naturally interact with rails, such as animals or non-redstone items, won’t move.
How do powered rails interact with other redstone components?
Powered rails can be integrated into complex redstone circuits to automate transportation systems. By using repeaters, comparators, and other components, you can create controlled environments where powered rails deliver items or mobs automatically. Make sure to test each segment of your rail circuit to ensure proper functioning.
This comprehensive guide provides you with everything you need to create and optimize powered rails in Minecraft. From basic placement to advanced loop configurations, you'll be able to transport items and mobs across your map with ease, enhancing both your gameplay and efficiency.
Remember, practice makes perfect. Experiment with different configurations to see what works best for your particular setup. Happy building, and may your travels across the Minecraft world be swift and efficient!