Building a Nether portal is a crucial step for any Minecraft adventurer looking to explore the fiery and dangerous dimensions of the Nether. This guide will provide you with step-by-step guidance to help you construct your first Nether portal, avoiding common pitfalls and providing practical solutions to maximize your Minecraft experience.
The Problem and Solution
Creating a Nether portal in Minecraft can seem daunting, especially for newcomers. The key problem is ensuring you have the correct materials, understand the size requirements, and successfully ignite the portal to enter the Nether. Without a clear, step-by-step approach, it’s easy to make mistakes that can delay your journey or cause unnecessary frustration. This guide aims to solve these issues by offering actionable advice, real-world examples, and practical solutions to ensure you can efficiently and safely build your Nether portal.
Quick Reference
Quick Reference
- Immediate action item: Collect eight Obsidian blocks and a Flint and Steel
- Essential tip: Arrange your Obsidian blocks into a rectangle or square
- Common mistake to avoid: Using incorrect materials, such as cobblestone or dirt
Detailed How-To Guide: Building Your Nether Portal
Materials You’ll Need
Before starting your project, ensure you have the necessary materials. For a Nether portal, you will need:
- Eight Obsidian blocks
- One Flint and Steel
Obsidian can be obtained by placing water on lava or by mining it from the Nether. It’s vital to acquire enough to form the frame of your portal.
Step-by-Step Instructions
Follow these steps to construct your Nether portal:
Step 1: Preparing the Portal Frame
1. Find a suitable location in your world where you have enough open space to construct a rectangle. The portal’s minimum size is 4x5 blocks.
2. Remove the grass, dirt, or other blocks to prepare the area. Make sure your area is large enough to accommodate your rectangle. You’ll be placing these blocks directly on the ground.
Step 2: Laying the Frame
1. Start by placing your first block in one corner of your chosen area. Add blocks in a line until you have formed one side of the rectangle.
2. Continue placing blocks, ensuring you have a solid and straight line, to complete the opposite side of the rectangle.
3. Complete the top and bottom lines by filling the remaining spaces, making sure the frame is rectangular and at least 4 blocks wide by 5 blocks tall.
Step 3: Carving Out the Portal
1. Once you have the frame, make sure you leave a 1-block space between the outer wall of blocks and the inside of your frame. This space will be where you light your portal.
2. Now, the portal is ready to be activated.
Step 4: Lighting the Portal
1. To activate the portal, locate or craft a Flint and Steel. This item can be made by combining a Flint and a Steel Ingot in a crafting table.
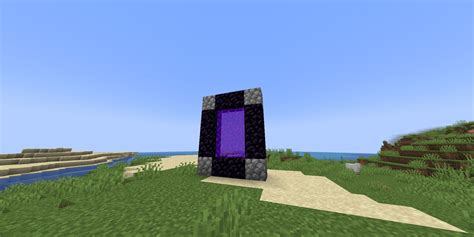
2. Right-click on the inside of the frame (the empty 1-block space) using the Flint and Steel. This will cause a bright effect and the portal will start smoking, signifying it’s ready to use.
3. As soon as the portal is lit, it will create a portal to the Nether, and you can step through to begin your exploration.
Practical FAQ
I’ve built the frame but can’t light it. What’s wrong?
If your frame isn’t lighting up, double-check that:
- You have the correct number of blocks: Ensure you have used exactly eight blocks to form the portal frame.
- Proper spacing: Make sure there is a 1-block space between your frame and any surrounding blocks.
- Correct item: Confirm you are using a Flint and Steel to light the portal.
By checking these elements, you can quickly identify and resolve any issues preventing your portal from lighting.
Building your first Nether portal may take a few tries, but following these guidelines will ensure you avoid common mistakes and understand the process thoroughly. Once you have a portal, the possibilities of exploration and adventure are endless. Happy crafting, and may your adventures in the Nether be prosperous!