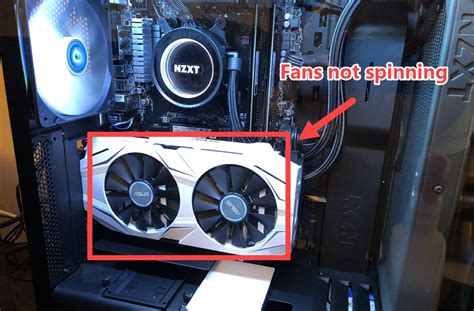
When it comes to diagnosing GPU fan issues, many users encounter frustrating moments where their graphics card’s fans don’t seem to be spinning, raising concerns about overheating or potential damage. This guide will walk you through the entire process of troubleshooting and resolving GPU fan issues, providing practical solutions to get those fans back up and running.
Understanding the Problem: GPU Fans Not Spinning
If your GPU fans are not spinning, it can lead to significant performance drops and potentially even hardware damage over time. This can be caused by a variety of reasons, ranging from simple dust build-up to more complex hardware malfunctions. This guide aims to tackle these issues head-on, providing step-by-step guidance to address user pain points and ensure your GPU runs efficiently.
Quick Reference
Quick Reference
- Immediate action item: Check for physical obstructions and clean the fans.
- Essential tip: Use compressed air to clean dust from fans and vents.
- Common mistake to avoid: Ignoring warning signs like unusual noises or fan vibrations.
Detailed How-To Sections
Step 1: Visual Inspection
Start by performing a visual inspection of your GPU. Look for any obvious signs of dust build-up, obstructions, or bent fan blades. Sometimes, the fans may appear to be spinning but are slowed down due to accumulated dust.
Tip: Make sure your computer is powered off and unplugged before opening the case to inspect your GPU. Use a microfiber cloth for cleaning delicate parts to avoid causing any scratches.
Step 2: Clean the Fans
Dust accumulation is a common culprit behind non-spinning GPU fans. To effectively clean the fans, follow these steps:
- Power down and unplug your computer. This ensures safety while you perform the cleaning.
- Open your computer case. Depending on your build, this might involve removing screws and panels.
- Use compressed air. Gently direct bursts of air through the GPU fans and vents. Hold the can upright and spray short bursts to avoid liquid propellant from entering the system.
- Wipe off any remaining dust. Use a microfiber cloth to wipe down any stubborn dust particles.
Best practice: Regularly clean your GPU fans every few months to prevent excessive dust accumulation.
Step 3: Check for Physical Obstructions
Fans can become obstructed due to small debris like dust, pet hair, or even small objects like screws or paper clips. Check if anything is physically blocking the fan blades from spinning freely.
Solution: Carefully remove any obstructions without using sharp objects that could damage the fan blades.
Step 4: Inspect and Replace Faulty Components
Sometimes, fans can stop spinning due to internal issues or failures. To determine if this might be the case:
- Listen closely: If you hear unusual noises such as grinding or buzzing, the fan might have internal mechanical issues.
- Check the fan connections. Ensure the fan connectors are securely plugged in and not damaged.
- Test with a different fan: If you have access to another GPU fan, temporarily swap it in to see if the issue persists.
- Consider replacement: If the fan is indeed faulty, consider replacing it with a compatible fan model. Always refer to your GPU’s user manual for proper replacement instructions.
Step 5: Check Thermal Paste and Heatsink
A properly functioning fan relies on good thermal management. If your GPU’s heatsink and thermal paste are worn out or improperly applied, it could affect the cooling performance and, by extension, fan operation.
- Power down and unplug your computer. Again, safety first.
- Remove the GPU. Depending on your build, this might involve removing screws and the card from the PCIe slot.
- Clean the heatsink: Use isopropyl alcohol to clean the heatsink surface.
- Reapply thermal paste: Apply a thin layer of thermal paste on the CPU/GPU die before reattaching the heatsink.
Step 6: Software and BIOS Check
Fans are often controlled by software and BIOS settings. Make sure these are configured correctly:
- Open your BIOS/UEFI: Access your computer’s BIOS by restarting your computer and pressing the designated key (often DEL, F2, or ESC).
- Check fan settings: Navigate to the hardware monitoring section and check if the fan speed settings are configured properly.
- Update BIOS: Ensure your BIOS is up to date. Visit your motherboard or GPU manufacturer’s website for the latest version.
- Monitor fan speeds: Use software like HWMonitor, SpeedFan, or the built-in Windows Performance Monitor to check if the fans are spinning correctly under different conditions.
Step 7: Reset CMOS/BIOS
Sometimes, a CMOS/BIOS reset can resolve issues related to fan control. This process varies by motherboard but generally involves:
- Power down and unplug your computer.
- Locate the CMOS battery: This is a small, round battery on the motherboard. Some boards have a jumper that can be moved to reset the BIOS.
- Remove or clear the CMOS battery: If you have access to a jumper, move it to the reset position as per the motherboard manual. If there’s no jumper, remove the battery for a few minutes before reinserting it.
Note: This process can sometimes reset all BIOS settings to factory defaults, so be prepared to reconfigure your setup.
Practical FAQ
What if my GPU fans still won't spin after cleaning?
If cleaning and basic troubleshooting steps didn’t resolve the issue, there are a few more advanced actions you can take:
- Test in another computer: Try installing your GPU in another system to see if the problem persists, which can help identify if the GPU or the original system is the issue.
- Check fan voltage: Use a multimeter to check if the fans are receiving proper voltage. If not, there might be an issue with the motherboard or the fan controller.
- Inspect fan motor: If you’re comfortable with it, inspecting the fan motor for signs of damage or wear might be necessary. Sometimes a burnt-out capacitor or other components can prevent fans from spinning.
- Consider professional help: If none of these steps resolve the issue, it may be time to consult a professional technician for a more in-depth diagnosis.
Remember, regular maintenance is key to keeping your GPU fans and overall system running smoothly. Following these steps and tips will help you address fan issues effectively, ensuring your system stays cool and performs optimally.